The Artist’s Guide to Craft Fairs and Markets: Taking Your Products on the Road
There’s something magical about watching someone pick up your card, smile, and walk toward you with their wallet out. Selling in person at craft fairs, art markets, and Christmas fairs is one of the most direct and rewarding ways to connect with buyers. It’s also hard work, and success doesn’t happen by accident. After years of doing these events, here is my complete guide to making them work for you.
By the way, if you are reading this blog via Feedspot be aware that the company republishes my work without permission. In other words, this article was stolen from me. Please visit my website and sign up to receive my weekly blogs for free, and to support me as an independent creator. Thank you. https://alisongsaunders.co.uk/blog/
Step 1: Choosing the Right Events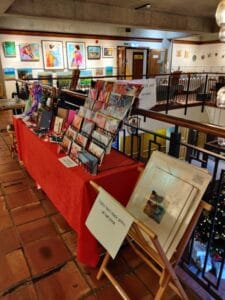
Not all fairs are created equal. A poorly attended event is a long, demoralising day. A well-run one can cover your costs in the first hour.
Questions to ask before applying:
- Who organises it? Established organisers with a track record are worth the application fee.
- What’s the footfall like? Ask for visitor numbers from previous years. Organisers should have this data.
- Who is the audience? Does it attract art buyers or gift shoppers? Both can be good, but you need to know.
- What’s the fee? Calculate your break-even point. How many cards or prints must you sell just to cover the table fee and your travel costs?
- When is it? Christmas fairs book up months (even a year, sometimes) in advance. Plan your year ahead.
Start small. Choose one or two well-regarded local events in your first year. Learn the ropes before committing to expensive, distant fairs.
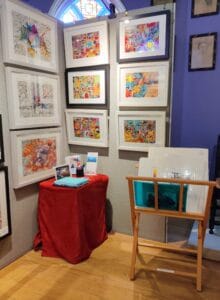
Step 2: Preparing Your Stall (The Art of Display)
Your stall is your gallery for the day. It needs to stop people walking past and invite them in.
Essentials for a Professional Stall:
- Tables and Coverings: A plain white or black tablecloth looks clean and professional. Iron it the night before.
- Vertical Display: Don’t just lay everything flat. Use small easels for prints, gridwalls for hanging cards, or cake stands for elevating smaller items. Varying heights creates visual interest.
- Clear Signage: Your name/logo should be visible from a distance. Price everything clearly. If things aren’t priced, many people will walk away rather than ask.
- Lighting: If the venue is dim, bring battery-operated lights. Well-lit work sells better.
- Business Cards and Info: Have a stack of cards and a simple way for people to join your email list (a sign-up sheet on a clipboard works perfectly).
- Comfort Kit: Comfortable shoes, snacks, water, a charging bank for your phone and card reader (see below), and patience.
Step 3: Stocking Your Stall
You need enough product to look established, but not so much that it’s overwhelming.
A good rule of thumb:
- Greetings Cards: 15-20 designs, with 5-10 of each. Display them in boxes or on spinning racks so people can browse.
- Prints: Have a range of sizes and prices. Smaller, affordable prints (£10-£20) are your bread and butter. A few larger, statement prints add prestige.
- Originals: If you bring small original works, display them prominently. They attract serious buyers.
- Test the Range: Bring a few new products to see what resonates. Customer feedback at fairs is invaluable.
Step 4: The Day Itself (Connecting with Customers)
This is where your introvert-friendly networking skills, as discussed in Blog 59, come into play.
Tips for engaging:
- Smile and Make Eye Contact: A simple “Hello, feel free to have a browse” is enough. Don’t pounce.
- Read the Room: Some people want to chat. Ask what they’re drawn to, share the story behind a piece. Others want to browse quietly. Let them.
- Handle Cards Gently: When someone picks up a card, handle it with care. It signals that your work is precious.
- Take Multiple Payment Methods: Have a card reader (like SumUp or Zettle) and be ready for cash. You will lose sales if you only take one.
- Stay Energised: Eat properly, drink water, and take short breaks to walk around if you can. It’s a long day.
Step 5: After the Fair (The Follow-Up)
The sale isn’t the end; it’s the beginning of a relationship.
- Email List: Everyone who bought something or showed interest should be invited to join your mailing list. Send a gentle follow-up email a few days later thanking them for their support.
- Social Media: Post photos of your stall and tag the event organiser. Share your excitement about the day.
- Evaluate: What sold well? What didn’t? What would you do differently next time? Take notes while it’s fresh.
A Final Word
Craft fairs are a marathon, not a sprint. Your first one might feel overwhelming. Your fifth will feel like coming home to old friends. Each event teaches you something about your work, your customers, and yourself. Embrace the learning, celebrate the connections, and know that every person who walks away with your art in their bag is now an ambassador for your creative world.
NB I do not get paid to endorse any people or brands mentioned in my blogs. If you enjoyed this post, please like, share and follow me. Sharing, liking and following raises the algorithms in my favour.
Thank you for your support.
Internal Linking Prompts for You:
- Link to Blog 59: Networking for Introverted Artists when discussing engaging with customers.
- Link to Blog 62: From Original to Reproduction when discussing stocking your stall.
- Link to Blog 46: Where to Show Your Artwork when discussing choosing events.